header

AngliaSaloonEstateVanPick UpTorinoConvertibleKit CarsSpecials
AdvertsArticlesBooksBuyingForgottenHistoryLegalLinksMisc Items
ModelsMoviesMy CarPhotosPoliceRacingSite NewsStoriesTechnical

You are in:

Technical
Wheels
and Tyres

General Maintenance - Wheels and Tyres

The wheels and tyres specified for your vehicle have been designed to give you maximum riding comfort with good steering stability. Tubeless tyres are probably supplied with your vehicle and these can be identified by the word “Tubeless” moulded on the outer sidewall. The tyre pressures advised below are suitable for tyres of both the conventional and tubeless type, and instructions given for tyre rotation and wheel changing etc, are also applicable to both types.
Note – The tyres originally supplied with the Anglia were Cross Ply tyres.
Wheel Nuts
It is good practise to check all of the Wheel Nuts on a regular basis for tightness. Do not use any sort of extension bar, as ordinary pressure exerted on the handle of the wheel brace supplied with your vehicle is sufficient.
Tyre Pressures
Tyre Pressures
It is necessary to keep the tyre pressures at the specified figures, checking the pressures at least once a week is recommended. It's not always apparent that air is being lost, but it generally escapes at the rate of up to two pounds of air every month. More air is usually lost during warm weather, so more regular checks are needed when temperatures rise. Incorrect tyre pressures or excessive wear can adversely affect the steering and braking of the car.

The tyre pressure should be checked before a run whilst the tyres are cold, as a hot tyre will give a higher reading. If the tyres are checked hot, do not, in any circumstances, bleed off this increase in pressure.

Tyre Pressures
The air pressure in the tyres has a pronounced effect on the action of the brakes, as well as the correct operation of the front suspension and steering gear. To check the pressure of a tyre, remove the valve cap and press a suitable tyre gauge firmly into place on the end of the valve cap.

The correct tyre pressures are:
Anglia Saloon - 22lb/sq in (1.54 kg/sq cm) front and rear
Anglia Estate – 24 lb/sq in (1.69 kg/sq cm) front and 30 lb/sq in (2.11 kg/sq cm) rear
Anglia 5cwt Van - 24 lb/sq in (1.69 kg/sq cm) front and rear
Anglia 7cwt Van - 24 lb/sq in (1.69 kg/sq cm) front and 30 lb/sq in (2.11 kg/sq cm) rear

Spare Wheel
Anglia Saloon - The spare wheel in the Saloon is mounted vertically in the rear luggage compartment. A webbing strap is used to secure the wheel. For removal at any time, it will be necessary to raise the boot lid and release the webbing strap when the spare wheel may be removed.
Saloon Spare Wheel
Anglia Estate - The spare wheel in the Estate is located beneath a flap in the load space, accessible after releasing the five fasteners of the floor covering, by turning them one quarter of a turn anti-clockwise. Once the floor covering has been lifted the spare wheel may be removed.
Anglia Van - The spare wheel in the Van is located beneath the floor of the vehicle and behind the rear axle. To remove the spare wheel, insert the wheel brace in the aperture provided in the floor in front of the rear doors. Rotate the wheel brace anti-clockwise, which will lower the spare wheel carrier sufficiently for the spare wheel to be withdrawn. Van Spare Wheel
Jacking up the Car
There are two brackets mounted either side of the body to which the special jack supplied may be attached for raising the car. The arrangement allows for raising any one of the wheels completely off the ground by using the jack. Before using the jack, ensure that the hinged arm is positioned approximately midway on the threaded shaft, and that it will hang downwards from its pivot, towards the ground. It will only be necessary then to swing the arm upwards to engage the jacking bracket.

Ensure that the handbrake is applied, then raise the jack arm and insert fully into the appropriate jacking bracket, when the peg on the jack arm will abut the bracket. Swing the top of the jack towards the car body as far as the jack arm will permit and ensure that the base of the jack is firmly seated on level ground. When correctly positioned, the top of the jack will be inclined slightly away from the car.

Place the jack handle on the jack with the words “TO RAISE” or “TO LIFT” stamped on the jack handle uppermost. The car may then be jacked up by moving the handle from right to left.

To lower the jack, remove the handle and turn it over so that the words “TO LOWER” are now uppermost. Replace the handle on the jack and operate as before. (The current jack type is similar in operation to that of the former jack type.)

jack (earlier type)
Earlier Type of Anglia Jack

jack (later type)
Later Type of Anglia Jack

Warning – Before raising the vehicle or the vehicle’s wheels off the ground, ensure that the vehicle is on firm and level ground and that the handbrake is employed. DO NOT work under a vehicle that is only supported by a Jack.
Removing a Hub Cap
With the current wheel brace the Hub Cap can be removed without damaging the wheel trims that are fitted to the Super. Insert the flat end of the brace into any of the three slots between the wheel and the hub and prise off the hub cap.
hub cap
Removing a Wheel
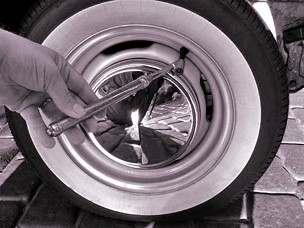
1 – Place the car on firm and level ground and apply the handbrake lever. Prise off the
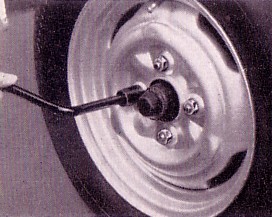
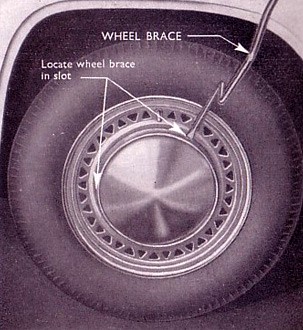
 hubcap.

2 – Slacken the wheel nuts with the wheel brace supplied, by placing the hexagonal end of the wheel brace onto the wheel nut and turning it anti-clockwise. Warning - Do not remove the wheel nuts at this stage.

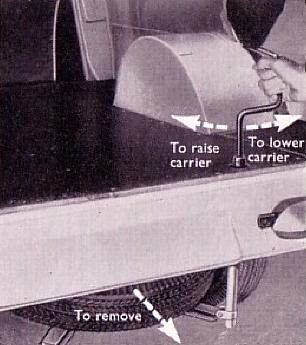
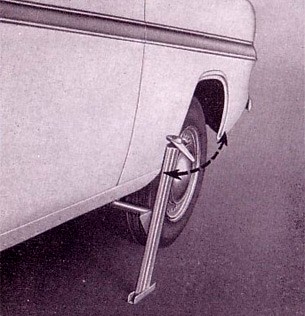
3 – Insert the jack into the appropriate bracket and operate the handle. (See instructions for Jacking up the Car above).

4 – Once the wheel is off the ground, remove the wheel nuts completely, when the wheel can be removed.

When replacing the wheel, tighten up each nut a few turns with the brace: then follow around the hub, tightening each alternate nut until all are tight. If the nuts are not drawn up evenly, the wheel may not run true.
It should be noted that all wheel nuts have rights hand threads and that the conical ends of the nut screws on to the stud first. Tighten all wheel nuts after the first 300 miles (500 km) and occasionally thereafter, particularly after changing a wheel.

Removing a Tyre
Wheels are of the wide base type, and the removal and fitting of conventional tyres having inner tubes is easily effected by pressing the tyre bead into the well, at the same time drawing the opposite side over the rim by means of a tyre lever. It should not be necessary to use undue force: if the cover will not readily lift over the rim, this may be due to the opposite edge not fully entering the well. Ensure that the tube is fully deflated and the tyre bead is not adhering to the wheel flange.

When ever possible, use tyres having the moulded line for centralising them on the wheels. When mounting the tyre, see that it is correctly seated as indicated by the moulded line of the tyre being equally spaced from the rim at all points.

Tubeless tyres should not be removed unless a compressed air supply is available; this is necessary when the tyre is being replaced, to expand the tyre beads against the rim flanges. If it is necessary to remove the tyre, your Authorised Ford Dealer or specialist Tyre Supplier should be instructed to carry out the necessary work.

Warning - Only attempt to remove tyres from their rims, if you have suitable equiment for the task and you have been trained in its use.

Care of your Tyres
It is recommended that the wheels are changed around from time to time to equalise tyre wear as follows:
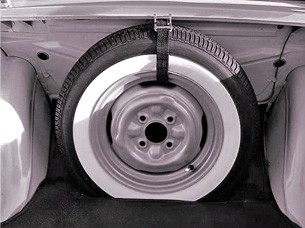
Spare to left front, left front to left rear, left rear to right front, right front to right rear and right rear to spare wheel compartment. If no spare is available, the tyres should be repositioned by moving the rear wheels to the front and putting the right front wheel on the left rear hub and the left front wheel on the right rear hub.

Wheel balancing is also an important factor in tyre wear, and when your vehicle was built the wheels and brake drums were balanced within normal limits. As the vehicle is used on the road one or other of the front tyres may wear a little unevenly and this could in time affect the balance of the complete wheel.
Your Authorised Ford Dealer or specialist Tyre Supplier has suitable wheel balancing equipment so that any noticeable out of balance effect can be corrected, but such balancing is usually only necessary on the front wheels.

Although tyre repositioning is important in that it evens out tyre wear, one of the greatest causes of premature tyre wear is careless or improper inflation. Another important factor which can affect tyre life is, faulty wheel alignment, incorrectly adjusted brakes and hard braking or acceleration.

Inspect the tyres frequently, looking at the wear on the tread, and remove any pieces of flint, sharp stones etc which may have become embedded in the thread.

White Side Walled Tyres
White side walled tyres may be cleaned by scrubbing with a soap solution or suitable detergent. There are also various products available on the market specifically designed to clean white side walled tyres.

Note - Do not use petroleum spirit or spirit solutions.

Brillo Pad
Front Wheel Alignment
If at any time it is felt that the front wheel alignment requires attention, as could be seen by some condition such as undue tyre wear or heavy steering, an Authorised Ford Dealer or specialist Tyre Supplier should be permitted to check the system with the special equipment developed for this purpose.

Information taken from Various Ford Anglia Instruction Books and Handbooks..

Warning - The Health and Safety bit.
Please note your health may be at risk if you do not take sensible safety precautions. Never work under an unsupported vehicle, do not take shortcuts. If you feel that the task is beyond your capabilities, then employ the services of a trained professional. The Owner of this Website nor the author cannot be held responsible for any accidents or injury arising from advice given on this webpage. Safety advice can be obtained from the RoSPA.

Top