You are in:

GM
Lighting
Equipment |

General
Maintenance - Lighting Equipment
Ford Anglia
105E Lights
| External
Lighting:- The bulbs in the lighting
system are so wired that the burning out or
removal of any one bulb will not affect the
others. The headlamp bulbs will only fit in one
position, due to the recess in the bulb flange
corresponding to a raised portion in the bulb
holder. The side and front direction indicator
bulbs, rear, stop and direction indicator bulbs
are located in bayonet holders that are integral
with the lamp housings. They will only fit one
way round since the bulb bodies have offset pins. |
|
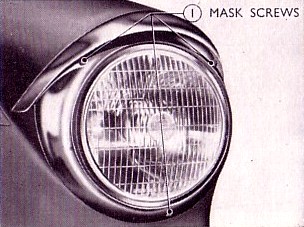
Remove the headlamp mask.
This is held in position by three screws, two
either side of the "eyebrow" and one at
the base of the mask. |
|
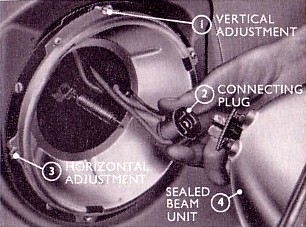
Headlamp Bulbs
First remove the headlamp mask. Press lightly in
on the headlamp and turn the lens and reflector
slightly anti-clockwise until the three plain
headed adjusting screws pass into the larger
portion of the keyhole attachment holes. Pulling
it forward will expose the bulb holder at the
rear of the reflector. The bulb may then be
removed by twisting the headlight bulb socket
slightly anti-clockwise. Once the bulb has been
replaced, refit the headlamp assembly and
headlamp mask |
|
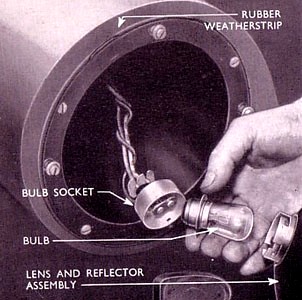
Sealed Beam Headlamp
First remove the headlamp mask. Unscrew the
screws retaining the chrome ring around the
sealed beam unit (being careful not to alter the
position of the adjusting screws). These units
have the main and “dip” filaments
sealed in a glass unit, which includes the lens
and reflector. Pull the socket from the rear of
the unit. Only the complete unit is replaceable. (On
later models the socket also incorporates the
sidelight bulb). Once the unit has been
replaced, refit the chrome ring and headlamp
mask. |
 |
Saloon, Estate and Van Side
and Front Direction Indicator Bulbs.
On earlier models a dual filament bulb is fitted
at the front, so that the direction indicator and
sidelight are in the same unit. (On later
models the sidelight became a separate unit,
which was replaced even later with a sidelight
that was incorporated in the headlamp socket of
the sealed beam unit.) These bulbs can be
renewed by first removing the three screws
securing the lens to the body of the light. Next
remove the leg from the base of the diffuser.
Hinge up the diffuser and remove. Now the bulb
itself can be removed and replaced and the
diffuser and lens replaced. |
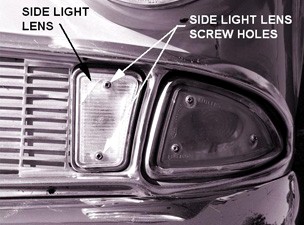 |
Saloon, Estate and Van
Separate Front Sidelight Bulbs
The side light bulb can be renewed after removing
the clear lens by unscrewing the two cross-headed
screws. Now the bulb can be removed and replaced
and the lens refitted. |
Saloon Rear Direction
Indicator Bulb
The direction indicator bulb may be renewed after
removing the amber lens by unscrewing the two
cross-headed screws. Now the bulb can be removed
and replaced and the lens refitted.
Saloon Rear and
Stop light Bulb
The rear and stop light bulb can be renewed after
removing the red lens by unscrewing the two
cross-headed screws. Now the bulb can be removed
and replaced and the lenses refitted.
|
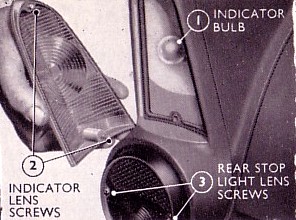 |
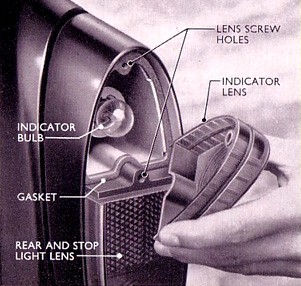
Estate Rear, Stop and Rear
Direction Indicator Bulbs
The rear / stop light and indicator bulbs can be
replaced by unscrewing the screw in the centre
chromed piece and pilling it out. Unscrew the
screws retaining the amber lens and /or red lens
and pull them off. Now the bulb(s) can be removed
and replaced and the lenses refitted. |
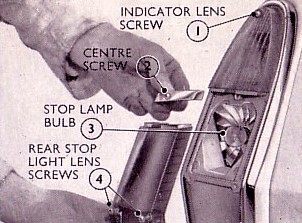 |
Van Rear, Stop and Rear
Direction Indicator Bulbs
The direction indicator bulb may be renewed after
removing the amber lens by unscrewing the two
cross-headed screws. Now the bulb can be removed
and replaced and the lens refitted.The rear and stop light
bulb can be renewed after removing the direction
indicator lens and then the third screw holding
the lower lens to the body. The bulb can now be
removed and replaced and the lenses refitted.
|
 |
| A
5-amp fuse is incorporated in the electrical
system to protect the flasher unit operating the
direction indicators. The fuse is mounted in a
plastic bayonet type holder, inserted in the unit
feed wire and positioned behind the instrument
panel. Should the flasher indicators fail to
operate, first check this fuse, or have your Auto
Electrician locate the fault for you. Saloon / Estate
Rear Number Plate Light
The bulb is located under a glass cover under the
rear number plate. To replace a bulb, remove the
two screws retaining the cover and remove the
cover. The bulb can now be removed and replaced
and the cover refitted to the lamp base.
Van Rear
Number Plate Light
The bulb may be renewed after unscrewing the two
cross-headed screws securing the lamp bracket to
the bodywork and then the screws holding the lens
to the bracket. The bulb can now be removed and
replaced and the lens and bracket refitted.
When refitting a
lens, ensure that the components are
satisfactorily sealed by the gasket so preventing
the ingress of dirt, water etc. (Some lenses,
gaskets and light castings are available from the
Ford Anglia 105E Owners Club if you need to
replace a damaged lens, gasket or casting)
Internal
Lighting:-
Panel
Lamp and Warning Light Bulbs
These bulbs are located behind the main
Instrument Panel. These are removed from behind
the panel. It is necessary to withdraw the
appropriate holder by twisting and pulling on the
holder body (not the wire) taking care not to
impose any strain on the wire or connections.
|
Information taken from Various Ford
Anglia Instruction Books and Handbooks..
Warning -
The Health and Safety bit.
Please note your health may be at
risk if you do not take sensible safety
precautions. Never work under an unsupported
vehicle, do not take shortcuts. If you feel that
the task is beyond your capabilities, then employ
the services of a trained professional. The Owner
of this Website nor the author cannot be held
responsible for any accidents or injury arising
from advice given on this webpage. Safety advice
can be obtained from the RoSPA.
|

|
|

